BETAFPV Micro TX ELRS module
BETAFPV Micro TX ELRS Module The BETAFPV Micro RF TX module is based on the ExpressLRS project, an open source RC link for RC applications. ExpressLRS aims to achieve the best possible link performance in terms of speed, latency and range. This makes ExpressLRS one of the fastest RC links available while still offering long range performance. ELRS Micro TX Module Case and Fan are released now! The updated module case with 6.5*13.5mm USB port slot is compatible with most USB Type-C cables. In addition, there are two colors in the new module case. You can easily create your own...
Pay online with PayPal, credit, debit and prepaid cards securely, even on delivery!
BETAFPV Micro TX ELRS Module
The BETAFPV Micro RF TX module is based on the ExpressLRS project, an open source RC link for RC applications. ExpressLRS aims to achieve the best possible link performance in terms of speed, latency and range. This makes ExpressLRS one of the fastest RC links available while still offering long range performance.
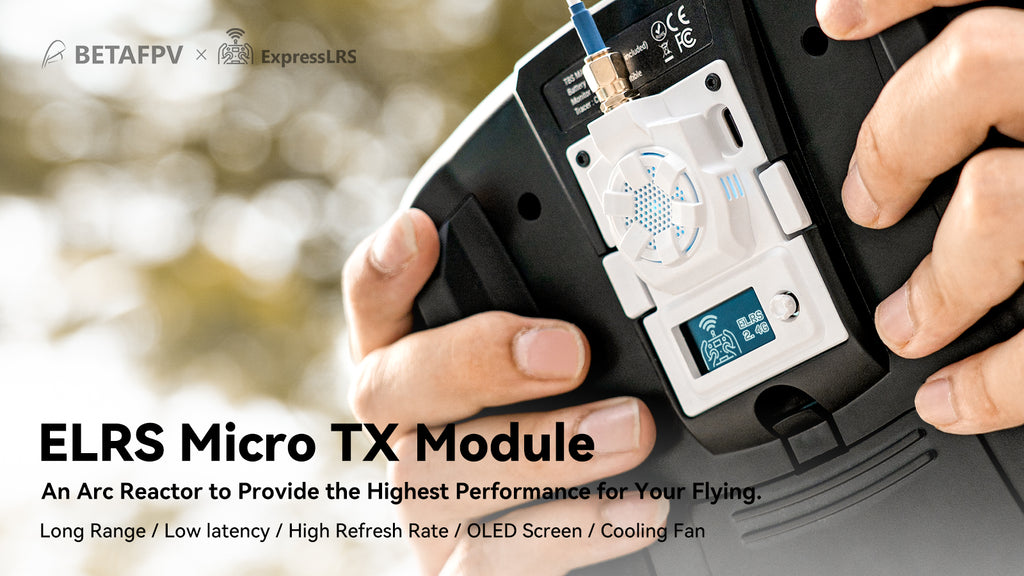
ELRS Micro TX Module Case and Fan are released now! The updated module case with 6.5*13.5mm USB port slot is compatible with most USB Type-C cables. In addition, there are two colors in the new module case. You can easily create your own module.
Specifications
- Article: ELRS Micro TX Module
- Input voltage: 5V~12V
- XT30 port: 5V~12V, recommend 2S(8.4V) battery, NOT support 3S(12.6V) or above
- USB Port: Type-C
| 2.4GHz 1W | 2.4GHz 500mW | 915/868MHz 500mW | |
| Package update frequency | 50Hz, 150Hz, 250Hz, 500Hz | 50Hz, 150Hz, 250Hz, 500Hz | 25Hz, 50Hz, 100Hz, 200Hz |
| RF Output Power | 25mW, 50mW, 250mW, 500mW, 1W | 25mW, 50mW, 250mW, 500mW | 100mW, 250mW, 500mW |
| Frequency bands | 2.4GHz ISM | 2.4GHz ISM | 915MHz FCC 868MHz EU |
| Radiator | Included | Not included | Not included |
| Backpack function | Support | I don't support it at the moment | I don't support it at the moment |
ELRS 2.4G 1W version
The black version with 1W max RF output power is now available. It supports all 5D button sizes based on BETAFPV ELRS V2.0.0 firmware. A new backpack function has been added, which enables wireless communication between ExpressLRS and other FPV related devices for command and control or configuration query.
Note: Make sure the VRX also supports backpack function when using the VRX backpack function of the module. The backpack function will be added to the 500mW version in the future.

Compared with 500mW versions, it not only incorporates a cooling fan, but also includes a heatsink, which improves cooling performance. So this module can work well in daily use and you don't need to worry about the temperature.
Note: For temperature testing, please read the article ELRS Micromodule Temperature .
 Limited Edition 1W
Apart from the classic case for the micro TX module, a limited edition will be released together. Both the classic and limited versions have the same function. The 3D printed case with a new aesthetic design makes the module look very cool when the LED light flashes. Limited stock, first come, first served!

Scheme
The BETAFPV Micro RF TX module is compatible with the radio transmitter which has the micro module slot (AKA JR/SLIM module slot, e.g. Frsky Taranis X9D, TBS Mambo). Below is the diagram for the 500mW version module.

Below is the diagram for the ELRS 2.4G 1W version. DIP switches will be added to the 500mW versions in the future.
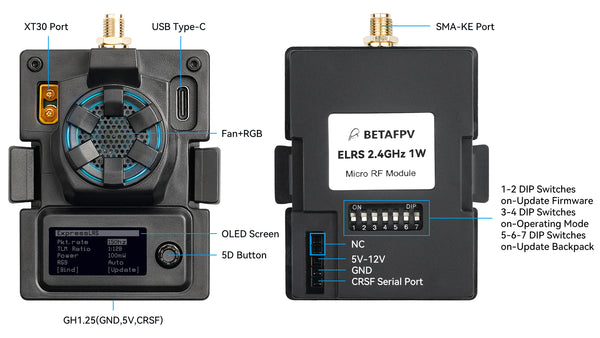
Note: Assemble the antenna before powering on. Otherwise, the PA chip in the Micro TX module will be permanently damaged.
Note: DO NOT use a 3S or above battery to power the TX module via the XT30 port. Otherwise, the power chip in the TX module will be permanently damaged.
Note: Do not turn on all the DIP switches at the same time. You can refer to the table to find out how to turn on/off the DIP switches according to different uses.
| 1-2 DIP switches | 3-4 DIP switches | 5-6-7 DIP switches | |
| Update firmware | ONWARDS | WORN OUT | WORN OUT |
| Operating mode | WORN OUT | ONWARDS | WORN OUT |
| Update backpack | WORN OUT | WORN OUT | ONWARDS |
Firmware Information
The official ExpressLRS project on Github does NOT support OLED functionality at the moment. The BETAFPV team will work with the ELRS team and get the official repository to support OLED and button functionality asap.
BETAFPV Micro TX Module ELRS V2.0.0 firmware is released. The firmware does not include Binding Phrase. So make sure your receiver works with officially major release V2.0.0 protocol and without Binding Phrase set.
- It supports 5D buttons and OLED menu with official ELRS 2.0.0 version.
- The LED color changes automatically according to the system status.
- Other new and various features are fully synchronized with official ELRS 2.0.0.
- When you enter the OLED menu page by long press, the connection between the RF TX module and the receiver works normally. Please do not change the Pkt Rate, otherwise you need to power on the receiver again.
https://github.com/BETAFPV/ExpressLRS
How to Flash Firmware User Manual of ELRS RX/TX.
Now you all could use the official ELRS firmware V2.0-RC2, but you lost the function of OLED and Joystick. We will work with the ELRS development team and make the official ELRS firmware support the full functionality of Micro TX module. For the milestone, OLED will be officially supported in V2.1.
https://github.com/ExpressLRS/ExpressLRS
How can I set a binding phrase on this Micro TX module when the official mainstream ELRS does not support OLED yet?
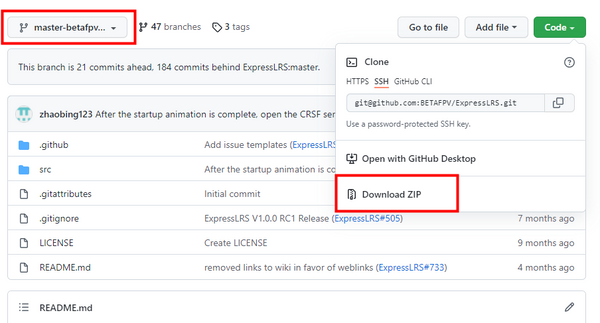
First , download the source code of the master-betafpv-oled-menu branch locally from Github .
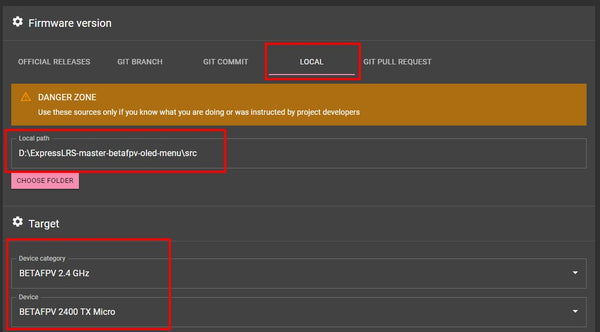
Second , open ExpressLRS Configurator and upload the upzipped source code from local. Select the target device "BETAFPV 900/2400 TX Micro". Now you can set your binding phrase and other options normally.
Third , build and flash.
Learn more about ExpressLRS
ExpressLRS is an open source RC binding for RC applications. Everyone could find this project on Github or join the discussion in Facebook Group .
ExpressLRS is based on Semtech Lora Hardware SX127x or SX1280 for RX and TX respectively. It aims to achieve the best possible link performance in both speed, latency and range. At 900MHz a maximum packet rate of 200Hz is supported. At 2.4GHz a whopping 500Hz is currently supported with a custom OpenTX build. This makes ExpressLRS one of the fastest RC links available while still offering long range performance.
More and more suppliers are starting to support the ExpressLRS radio protocol in different parts, such as a radio transmitter with ELRS in stock, a drone with integrated ELRS receiver, ELRS TX module for JR housing or Nano housing. The BETAFPV team is taking part in this project and provides a series of ExpressLRS components.
Backpack function
Some of the ExpressLRS TX modules include an additional ESP8285 chip, which allows us to communicate wirelessly with other ESP8285 enabled devices using a protocol called espnow. We call this chip the “TX-Backpack”. The purpose of the TX-Backpack is to enable wireless communication between the ExpressLRS and other FPV related devices for command and control or to query configuration.
https://github.com/ExpressLRS/Backpack/wiki
Button and OLED
The ELRS TX module can be configured via OpenTX LUA script. With OLED and button, the non-OpenTX radio controller which supports CRSF could easily use this ELRS Micro module. The following non-OpenTX radio controllers work well with this TX module. Futaba T16IZ, T16SZ and T18SZ (with 3.9e update), Wsky ET16, Radiolink AT9S Pro.
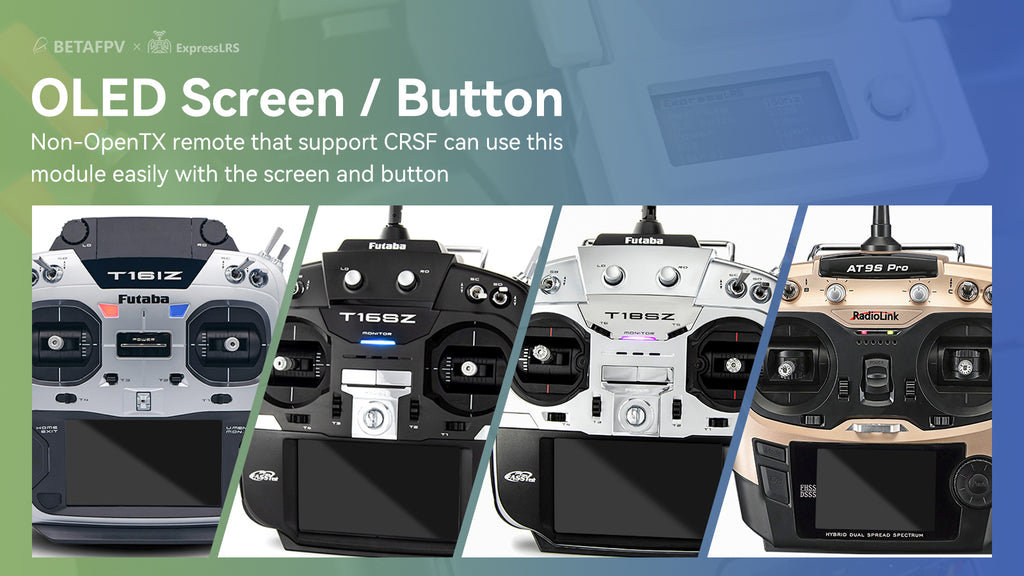
Note: All 5D button sizes are available on BETAFPV ELRS V2.0.0 firmware. Please update the firmware for new supports.
Below is the basic operation of the button and OLED for firmware V1.0.0.
Long press:
On the lock screen page, long press to unlock and enter the menu page.
In the menu page, long press to change the value of this line.
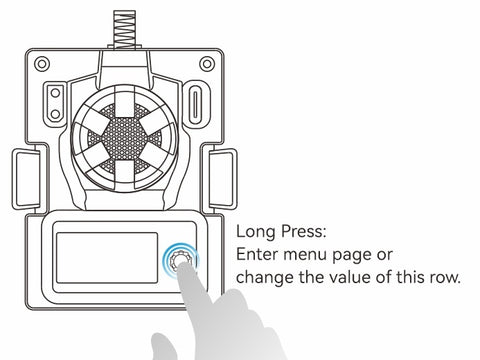
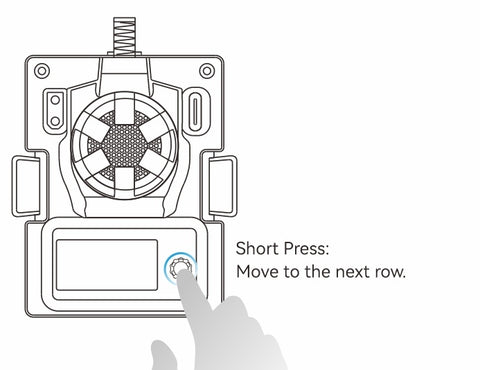
Short press:
On the lock screen page, short press invalid.
In the menu page, short press to move to the next line.
Note: When the RF TX module is entering the menu page, the connection between the RF TX module and the receiver will be lost, the connection will be restored after exiting the menu page automatically; you need to turn on the receiver again if the Pkt Rate has been changed.
Note: When the RF TX module enters the WIFI upgrade state, the button will be invalid. Please re-power the RF TX module after the firmware upgrade via WIFI.

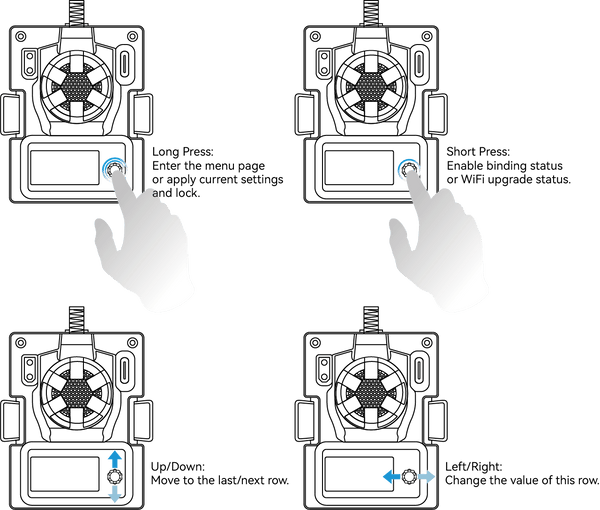
Below is the basic button and OLED operation for BETAFPV ELRS V2.0.0 firmware.
Long press: Unlock and enter the menu page or apply the current settings in the menu page.
Up/Down : Move to the last/next line.
Left/Right : Change the value of this row.
Short press : Enable pairing status or WiFi refresh status.
Note: You must restart the receiver if you have changed the Pkt Rate.
Note: When the RF TX module enters the WIFI upgrade state, the button will be invalid. Please re-power the RF TX module after the firmware upgrade via WIFI.

Basic configuration
ExpressLRS uses the Crossfire serial protocol (AKA CRSF protocol) to communicate between the transmitter and the TX module. So make sure your transmitter supports the CRSF serial protocol. We will use the transmitter with the OpenTX system to demonstrate how to set up the CRSF protocol and the LUA script. To set it up, in the OpenTX system, go into the model settings and in the “MODEL CONFIGURATION” tab, disable “Internal RF”. Then enable “External RF” and select “CRSF” as the protocol.
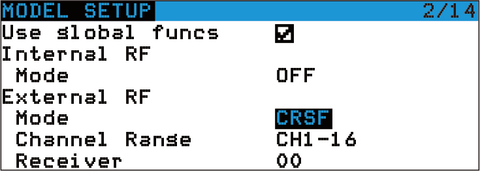
ExpressLRS uses OpenTX LUA script to control the TX module, such as connection or setup. With the LUA script, pilots could control and set some configurations of the Nano RF TX module. For more details, please check the Support Page .
- Save the ELRS.lua/ELRSV2.lua script files to the radio transmitter SD card in the Scripts/Tools folder;
- Long press the "SYS" button (for RadioMaster T16 or similar radios) or the "Menu" button (for Frsky Taranis X9D or similar radios) to access the Tools menu where you can find the ELRS/ELRSV2.lua script ready to be executed with just one click;
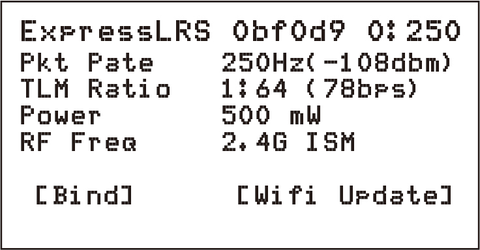
- The image below shows the LUA script running successfully;
ELRS.lua
ELRSV2.lua script
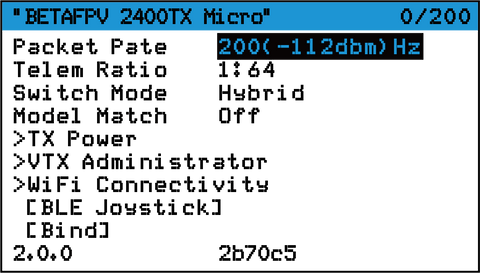
Binding and output power
Micro RF TX module comes with V1.1.0 or V2.0.0 officially major release protocol and does not include Binding Phrase. So please make sure your receiver works with V1.0.0~V1.1.0 or V2.0.0 officially major release protocol. And no binding phrase set. Micro RF TX module could enter binding state by ELRS.lua or ELRSV2.lua script, as described in the chapter "LUA Script". Also, using the button and OLED, switch to BIND position and long press the button. Short press the button if it is V2.0.0. Then the RF module will enter binding state.
ELRS.lua
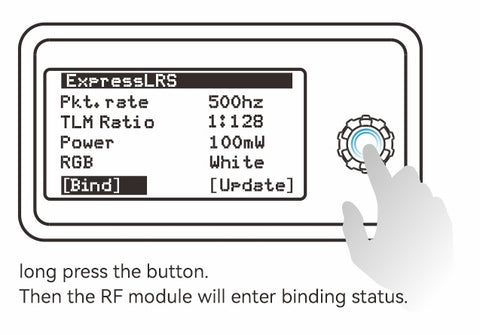
Note: The LED will NOT flash when entering the binding state. The module will exit the pairing state 5 seconds later automatically. Short press 3 times consecutively to bind.
ELRSV2.lua script
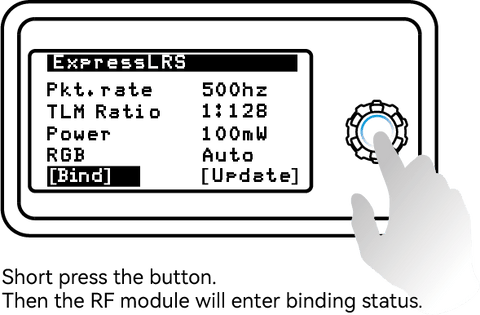
Note: The LED will NOT flash when entering the binding state. The module will automatically exit the pairing state 5 seconds later.
Note: If you update the firmware of the RF TX module with your own binding phrase, make sure the receiver has the same binding phrase. The RF TX module and the receiver will automatically connect in this situation.
The Micro RF TX module can switch the output power via the ELRS.lua or ELRSV2.lua script, as described in the chapter "LUA Script". Additionally, using the button and the OLED, switch to the Output position. Change the output power by long pressing the button (ELRS.lua script). By pressing the button left or right (ELRSV2.lua script).
ELRS.lua
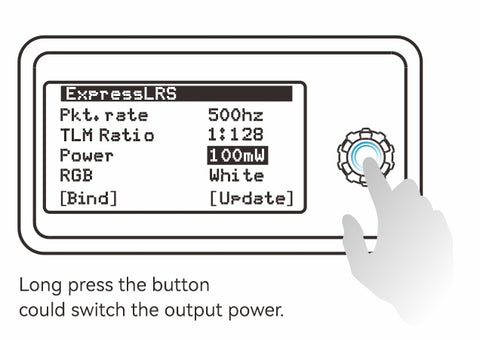
Note: The RGB LED will NOT change based on the output power. When the output power is 250mW or more, the fan will automatically spin. The Micro RF TX module does NOT support 1W or 2W output. When switching to this value, the system will automatically switch to 500mW.
ELRSV2.lua script
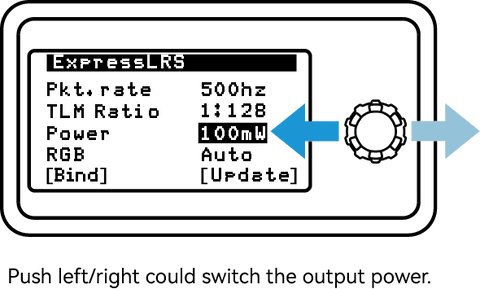
Note: The RGB LED will NOT change based on the output power. When the output power is the threshold value (default 250mW) or higher, the fan will automatically spin.
FAQ
Download BETAFPV ELRS Micro TX Module User Manual.
Package Included
- 1 * BETAFPV ELRS Micro TX Module
- 1 * Moxon BETAFPV Antenna
- 1 * Micro TX Module User Manual
- 1 * Replacement USB Data Cable (Type-A to Type-C)
The antenna in the box is not the same as shown below for the 915MHz and 868MHz versions.
The USB port housing is 6.2*11mm and may not be compatible with your USB cables. So a spare USB data cable (Type-A to Type-C) is included in the package for all orders after November 18, 2021.
In addition, with an updated USB port housing up to 6.5 * 13.5mm, the new module case is compatible with most USB Type-C cables, including yours. Click here to buy! At the same time, the ELRS Micro TX module comes with an updated case for orders starting now.
For the previous order, if you do not have a suitable USB cable for this Micro module, please feel free to contact us. Email to support@betafpv.com.

SHIPPING
Italy
• Express Shipping (1-4 working days)
• Free for orders over €150.00
• €9.99 for orders under €150.00
Europe (European Union)
• International Express Shipping (2-6 business days)
• €29.99 for all orders
PAYMENT METHODS
On Drone24hours.com you can use the following payment methods:
- Paypal
- Visa
- Visa Electron
- CartaSi
- Postepay
- MasterCard
- American Express
- Paypal prepaid cards linked to the Visa or Mastercard circuit
- Cash on delivery
Return Policy
You can return products that you are not satisfied with within 14 days of receiving your order. To be eligible for a return, the product must be in the same condition in which you received it, unworn or unused, with tags and in the original packaging. You must also have your receipt or proof of purchase.
Damaged or incorrect goods
In case you receive wrong or damaged goods, please contact us immediately within 14 days of receiving your order. Please send an email with photos and videos of the product, a detailed description of the problem and what you have done to solve it. You may be asked to return the item. For confirmed defective goods, we will send a replacement free of charge.
Exceptions / Non-returnable items
Some items cannot be returned, such as perishable goods (food, flowers, plants), personalized or made-to-order products, and personal care products (cosmetics). We do not accept returns on hazardous materials, flammable liquids, or gases. We do not accept returns on sale items or gift cards.
Exchanges
If you wish to exchange an item, the fastest way is to return it and place a new order for the new item.
Under the 24-month Legal Guarantee, Drone24Hours is responsible to the consumer for any defects in conformity that cannot be detected at the time of purchase.
The lack of conformity exists when the product is not suitable for the use for which it is normally intended, does not conform to the description or does not possess the qualities promised by the seller, does not offer the qualities and performances usual for a good of the same type, is not suitable for the particular use desired by the consumer if brought to the attention of the seller at the time of purchase and accepted by the seller (art. 129 of the Consumer Code).
Any lack of conformity which becomes apparent within 24 months of the date of purchase of the goods must be reported within 2 months of the date of discovery of the defect.
Unless proven otherwise, it is presumed that any lack of conformity that becomes apparent within 6 months of delivery of the goods already existed on that date. In the event of a lack of conformity, the consumer has the right to have the conformity of the goods restored, free of charge, by repair or replacement (art. 130 of the Consumer Code).
The consumer may ask, at his choice, the seller to repair the goods or replace them, free of charge in both cases, unless the requested remedy is objectively impossible or excessively expensive compared to the other. Repairs or replacements must be carried out within a reasonable time from the request of the Consumer; the average time for returning the product to the Consumer is 20 days.
If Drone24hours is unable to return the repaired product within the maximum period of 60 days, the consumer may request one of the alternative remedies (replacement, termination of the contract, price reduction).
Drone24Hours will send the product for any repairs to the Technical Assistance Center authorized by the Manufacturer.
What happens if the Service Center does not find the lack of conformity?
If the lack of conformity is not found, Drone24Hours will communicate the estimate to the Customer, who can decide whether or not to carry out the repair at his own expense. In this case, any transport costs and diagnosis of the defect requested by the Assistance Center will be borne by the Customer.
| Output power |
500mw, 1W |
|---|---|
| Frequency |
ELRS 2.4Ghz, ELRS 868hz |


